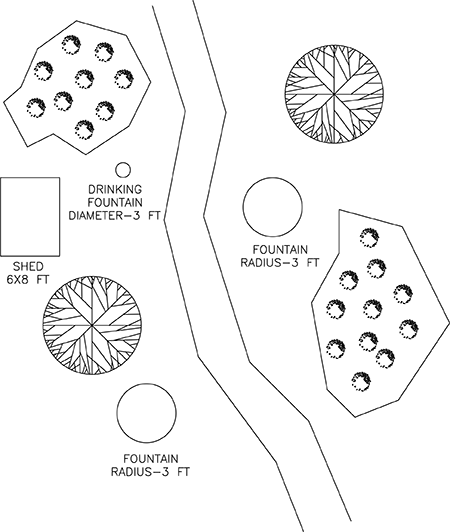
Familiarize yourself with the process of entering commands by finishing the drawing shown below. The drawing tools used will be covered in greater detail at a later date. This drawing is a site plan, and the units are set to decimal feet.
This exercise is excerpted from Noble Desktop’s past AutoCAD training materials and is compatible with Photoshop updates through 2020. To learn current skills in AutoCAD, check out AutoCAD Bootcamp and AutoCAD classes in NYC and live online.
Note: These materials are provided to give prospective students a sense of how we structure our class exercises and supplementary materials. During the course, you will get access to the accompanying class files, live instructor demonstrations, and hands-on instruction.
Topics covered in this AutoCAD tutorial:
Command Line, Dynamic Input, Enter Key
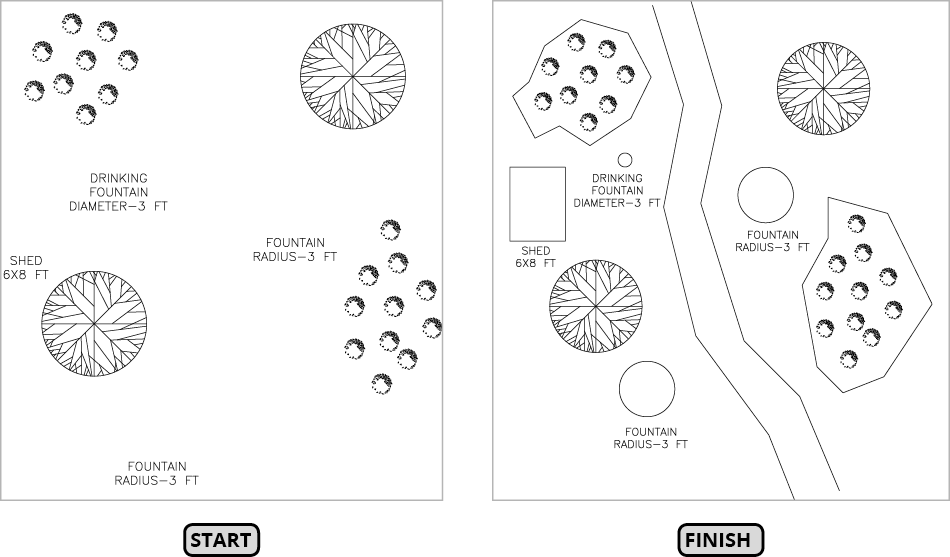
Exercise Preview
Exercise Overview
In this exercise, you will familiarize yourself with the process of entering commands by finishing the drawing shown above. The drawing tools used will be covered in greater detail in the next chapter. This drawing is a site plan, and the units are set to decimal feet.
Entering Commands
Open the file Landscape.dwg.
Type an R with the keyboard. You will see a list of commands that begin with the letter R appear in the Dynamic Input next to the crosshair cursor. Use the mouse or the down arrow to select REC (RECTANG) to start the Rectangle tool
 . Look in the Command Line. It tells you to specify the first corner and displays a set of options. Click above the word SHED to establish the lower left corner of the rectangle. The Command line tells you to specify the other corner and displays a different set of options. Type 6,8 and press Enter to make a rectangle that’s 6 feet deep along the X-axis and 8 feet wide along the Y-axis. If you don’t like the position of the rectangle, press Ctrl–Z to undo the rectangle and make it over again.
Now you will draw boundaries around the bushes with the Line tool
 . Press L Enter to start the Line Command. The Command Line will tell you to Specify First Point. Click outside the area of bushes at the top screen to start the first line segment. Now the Command line will read:
Specify next point or
[Undo]:Notice the Undo option appears. Click again to complete the first line segment. The Command Line will remain unchanged. Click again to complete the second line segment. Now the Command Line will read:
Specify next point or
[Close/Undo]:Now the Close option will appear because you have created two line segments making it possible to make a third segment that will connect the two to create a closed shape. Keep clicking to create line segments to surround the bushes. For the last segment, press C Enter to close the shape and end the Line Command.

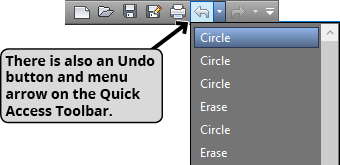
Right–click and select Repeat Line from the menu to relaunch the Line Command. Click around the other cluster of bushes, and after you create three or four line segments, press Ctrl–Z or U Enter to undo one or two segments. Notice that only the previous line segment is undone because you are still in the Line Command. When you are in a command, Undo will only retract the last step you took within that command. Undo several segments and then redraw them. Complete the boundary around the bushes using the Close option to end the line command. Press Ctrl–Z to Undo. Notice that the entire boundary disappears. Once you have completed a command, Undo will retract all the steps taken within that command at once. Press Ctrl–Y to redo the boundary.
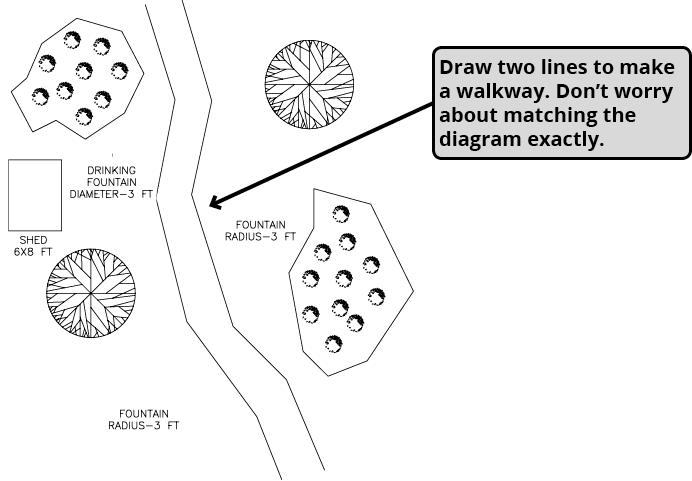
Because Redo was the last command you used, you cannot use the Enter key to repeat the Line Command. Press L Enter to start the Line command and draw the left edge of the walkway going from the top to the bottom of the drawing. When you finish drawing the edge, press Enter twice to end the Line command and start it again to draw the right edge.
Press C Enter to start the Circle Command. When you pressed C Enter in step two, it selected the Close option because you were in the Line Command, but with no command active, C Enter will start the Circle Command. In the Command Line, it says to specify a center point. Click above the word FOUNTAIN toward the top of the drawing to place the center point of the circle. Now that center point has been established; the Command Line will ask to specify a radius. Type 3 and press Enter to enter the radius and complete the circle.
Press Enter to repeat the Circle Command. Click above the word FOUNTAIN toward the bottom of the drawing to specify the center point. The radius of the last circle will appear in the Command Line inside the Less Than/Greater Than brackets
<3>. If anything appears inside the<>brackets, you can choose that option by pressing Enter. Press Enter to repeat the radius of 3 and end the Circle Command.For the next circle, you will enter the Diameter instead of the Radius. Press the Spacebar to repeat the Circle Command. If you look in the Command Line, you will not see the Diameter option. Click above the word DRINKING FOUNTAIN to specify a center point. Once the center point is established, the Diameter option will appear in the Command Line. Press D Enter to choose the Diameter option and enter a diameter of 3. You’ve finished the drawing!