
Occasionally, a client may want to announce achievements or success stories in a PowerPoint presentation. In that case, you should incorporate nontraditional, engaging motion graphics for the celebratory event. In this exercise, you will create two slides with exciting animations and a seamless transition. They will announce and highlight the Leaf Works locations that won a bid.
Getting Started
1. If you have any presentations open, in PowerPoint, go to File > Close to close them. You may have to close more than one.
2. Still in PowerPoint, go to File > Open to open the next project.
3. Under Open, click on On my Mac or This PC.
4. Navigate to the Desktop > Class Files > yourname-PowerPoint 2016 Class folder.
5. Double-click Game Show.pptx to open it.
Previewing the Game Show Animations
1. Go to File > Open to open the presentation with the completed slide we'll look at.
2. Under Open, click on On my Mac or This PC.
3. Navigate to the Desktop > Class Files > yourname-PowerPoint 2016 Class folder.
4. Double-click Completed Presentation.pptx to open it.
5. In the Slides list, in the Appendix section, click on the Game Show slide (Slide 22).
6. Press Cmd-Return (Mac) or Shift-F5 (Windows) to preview the slide's animations. (Each number represents an American Leaf Works coworking location.)
7. Click (or press Spacebar) to go to the next animation event. The first winning location is highlighted.
8. Click again to reveal the second winning location.
9. Click a third time to reveal the third and final winning location.
Just like in this finished slide, we need to smoothly animate all of the available locations onto the slide, then highlight each winning location after On Click cues (which add to the suspense of the big reveal). One at a time, representatives of each location can come up and share their successes and triumphs.
10. Press Esc to exit Slide Show View and return to Normal View.
11. Switch back to Game Show.pptx.
12. Let's put this slide in the Appendix just in case the presenter does not want to announce the achievement in this presentation. At the bottom of the Slides list, click in the narrow gray area right underneath the hierarchical chart slide.
13. In the Home tab, click the arrow part of the New Slide button and select Blank.
Advanced Text Styling: Line Spacing & Avoiding Overflow
First, we need to make the shapes that represent one of Leaf Works' locations. As you saw in the finished slide, there are 21 locations throughout the country. Let's arrange them so there are seven squares across and three down. Let's roll!
1. In the Insert tab, click the Shapes button, then click the Rectangle.
2. Click on the slide to create a 1" by 1" square (the size we want!).
NOTE: If you completed Exercise B3, the square should have a gray/white gradient. If it has a different style, delete the square and go to the Peter Bowen contact slide (Slide 19). Right-click on the gradient rectangle and choose Set as Default Shape, then go back to the Game Show slide and make another square.
3. In the new gray/white gradient square, type: Location
4. Highlight the word Location and in the Home tab, format the text as follows:
- Font: Arial Narrow
- Font Size: 16 pt
- Font Color: Turquoise, Accent 2 (sixth theme color)
5. To avoid any font issues that may occur when this PowerPoint presentation is transferred from your computer to your client, Right-click on the square and choose Format Shape.
6. Click on Text Options, then click the Textbox button.
If your client switches the font to a wider one, the text may not fit inside the box, making some of the text go onto the next line. We want to avoid that!
7. Uncheck Wrap text in shape. Now, if the text won't fit, it'll run outside of its text box. Not pretty, but better than the alternative of a next line nightmare.
8. Place the cursor after the n in Location and press Shift-Return (Mac) or Shift-Enter (Windows) to do a soft return.
9. In the new line, type: 1
10. We want the number to stand out, because it represents an office location. Highlight the number 1 to select it.
11. In the Home tab, set the following text properties:
- Font: Arial
- Font Size: 40 pt
- Font Color: Orange, Accent 4 (eighth theme color)
12. In the Home tab, in the Paragraph section, click the Line Spacing button, choose Line Spacing Options, and near the bottom, set the following:
- Line Spacing: Exactly
- At: 36 pt
13. Click OK.
14. Now Location and 1 are closer together, but notice that the text appears to have shifted slightly downward.
15. Right-click on the text box's bounding box and choose Format Shape.
16. Click on Text Options, then click the Textbox button.
17. Set Bottom margin to 0.2".
Positioning the Squares & Adding the First Row
1. We want to add a bevel effect so the number looks like it's carved into the square. To be able to add this effect, select the number 1.
2. In the (Shape) Format tab, click the Text Effects button, go to Shadow, and under Inner, select the first option (Inside Diagonal Top Left (Mac) or Inside: Top Left (Windows)).
3. Still in the (Shape) Format tab, click the arrow part of the Text Outline button, go to Dashes, and choose Solid Line.
4. Click the arrow part of the Text Outline button again and choose the eighth theme color, Orange, Accent
5. Right-click on the shape and choose Size and Position.
6. Under Position, set Horizontal position to 0.5" and Vertical position to 1.77".
7. Click on the square's bounding box and press Cmd-D (Mac) or Ctrl-D (Windows).
8. If the panel on the right isn't already showing the size and position controls, Right-click on the duplicate shape and choose Size and Position.
9. Set Horizontal position to 1.83" and Vertical position to 1.77".
10. Click on the duplicate's bounding box and press Cmd-D (Mac) or Ctrl-D (Windows).
11. If the new duplicate isn't already in the right position, drag the duplicate to the right so that there's the same amount of space between shapes, and they're all still top-aligned to each other, as seen below:
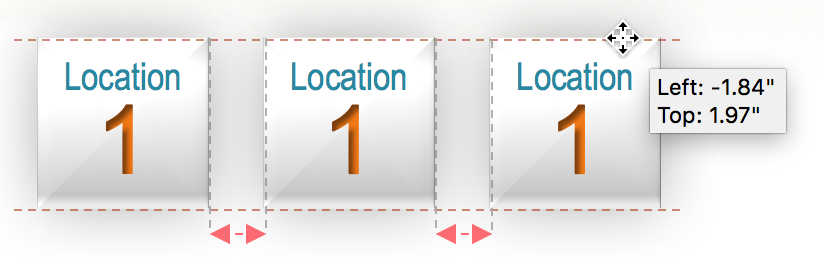
12. Press Cmd-D (Mac) or Ctrl-D (Windows) four times, creating a total of seven shapes comprising the first row:

13. Select all of the shapes so we can align and distribute them evenly.
14. In the (Shape) Format tab, click the Align button and choose Align to Slide.
15. Click the Align button again and choose Distribute Horizontally.
Creating the Second & Third Rows
1. In the View tab, check on Ruler if it isn't already selected.
2. Select the leftmost square.
3. As shown below, hold Option-Shift (Mac) or Ctrl-Shift (Windows) and drag the leftmost square so it's directly below the original, but with about 0.5" of separation. (Remember, the shapes are 1" x 1".)

4. Highlight the number 1 in the square you just created in the second row.
5. In the (Shape) Format tab, click the arrow part of the Text Fill button and select the fifth theme color, Lime, Accent 1.
6. Click the arrow part of the Text Outline button and select the same color, Lime, Accent 1.
7. Select the lime green square and press Cmd-D (Mac) or Ctrl-D (Windows) to duplicate it.
8. Drag the shape so that it aligns with the one above it, and the one to its left. (This time, you'll see orange guides on all sides of the shape.)
9. With this shape still selected, press Cmd-D (Mac) or Ctrl-D (Windows) five times. There should be a total of seven shapes in the second row.
NOTE: If after duplicating, you notice that the shapes aren't exactly aligned with the first row, you probably didn't align the second shape in the second row correctly, so try again.
- Repeat the previous steps on your own to create a third row with seven shapes, but with the number 1 set to:
- Text Fill: Turquoise, Accent 2 (sixth theme color)
- Text Outline: Turquoise, Accent 2 (same as text fill)
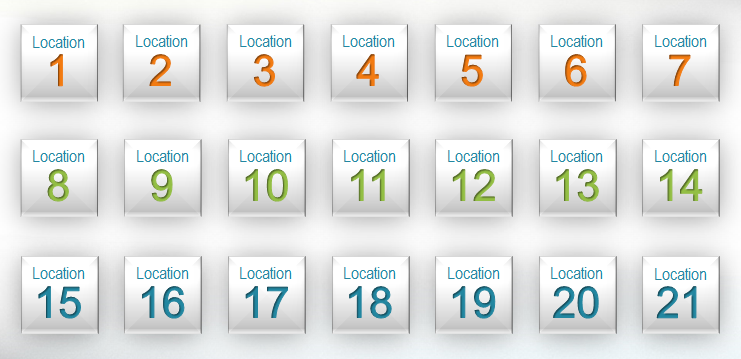
You should now have a total of 21 squares—seven per row and three per column. All the rows and columns should be perfectly aligned with each other.
10. Now that all of the shapes are in place, let's edit all of the numbers. Leaving the word Location as is, replace the second rectangle's number 1 with 2 and the third shape's number 1 with a 3—etc., until you have the following:
Sectioning Rows with Divider Lines
Let's add divider lines to separate these three categories. We've previously created a line with the styling we want. Let's go grab it!
1. In the Slides list, click on the Quote slide (Slide 4).
2. Click twice on one of the dotted lines (you have to click twice to select an individual element within a group).
3. Copy the dotted line.
4. In the Slides list, go back to the slide with the game show squares.
5. Paste the line onto the slide.
6. Drag the entire line so that it's left-aligned with the first and second rows, and exactly centered between them.
NOTE: If you need to fine-tune the alignment, select the line and the first square in both the first and second rows. In the (Shape) Format tab, click the Align button and choose Align Selected Objects. Click the Align button again and choose Distribute Vertically.
7. Hold Shift and drag the right endpoint of the line, extending it so that it becomes right-aligned with all the shape rows.
8. Press Cmd-D (Mac) or Ctrl-D (Windows) to duplicate the divider line.
9. Drag the duplicate line downward so it's centered between the second and third rows, and aligned with the original line. (Use the Align button if needed.)
10. Drag a selection box around everything on the slide so we can tweak the alignment.
11. Right-click on the selection and go to Group > Group.
12. In the (Shape) Format tab, click the Align button and choose Align Middle.
13. Right-click on the group and go to Group > Ungroup.
Animating the Game Show
Now that everything is in place and is the correct color, let's begin animating!
1. If everything on the slide isn't selected, drag a selection box around everything.
2. Shift-click on the two lines to deselect them.
3. From the Animations tab's green Entrance Effects, click the Fade effect.
4. Click on a blank area of the slide to deselect all the objects.
5. If the Animation Pane isn't already showing on the right, go into the Advanced Animation section and click the Animation Pane button.
6. In the Animation Pane on the right, click through a few of the listed items. You can do this to make sure that the squares will appear in the correct order.
7. In the Animation Pane, select Location 1 (Mac) or the first Rectangle (Windows).
8. In the Animations tab, in the Timing section, set Start to With Previous.
9. In the Animation Pane, preview the slide by clicking Play From. Notice that all the squares animate in at once—definitely NOT what we want.
10. In the Animation Pane, with the first item still selected, Shift-click on the last item listed to select all of the squares.
11. In the Animations tab, in the Timing section, set Start to After Previous.
12. Click on the first item in the Animation Pane, then click the Play From button to preview the sequence.
Smooth, huh? Admittedly though, all of the squares take too long to animate in.
13. Select all of the items listed in the Animation Pane, then in the Animations tab, set Duration to 00.15.
14. On the slide, select the top divider line (make sure to select it first because we want it to appear before the lower one does).
15. Shift-click on the bottom divider line to select both of the lines.
16. From the Animations tab's green Entrance Effects, click the Split effect. This animates the two halves of the selected content in the direction of your choice. By default, the two halves animate toward each other vertically, joining up at the end.
17. We want the animation to start in the middle of the content, so the halves animate away from each other (the vertical direction is fine, though). Click the Effect Options button and choose Vertical Out.
18. Set Start to After Previous.
19. Click on the first item in the Animation Pane, then click the Play From button to preview the sequence again.
Better, but not quite right. We want the first line to appear after the Location 7 square animates in and the second one to show up after the Location 14 square.
20. On the slide, click on the numbered box to the left of the Location 7 square.
21. In the Animation Pane, notice that Location 7 (Mac) or a Rectangle (Windows) has been highlighted.
22. Windows users only: Because the numbers differ across trials, either memorize the Rectangle currently highlighted, or write down its number in a TXT file on your computer or on paper.
23. Still in the Animation Pane, drag the first Straight Connector so that it sits below Location 7 (Mac) or the previously highlighted Rectangle (Windows). Now the line will animate in after the last shape in the first row animates in.
24. On the slide, click on the numbered box to the left of the Location 14 square.
25. Windows users only: In the Animation Pane, Location 14 correlates to a highlighted Rectangle . Again, write it down or remember it.
26. Still in the Animation Pane, drag the second Straight Connector so that it sits below Location 14 (Mac) or the previously highlighted Rectangle (Windows).
27. Click on the first item in the Animation Pane, then click the Play From button to preview the sequence again. Perfect!
Highlighting the Winners: The Big Reveal
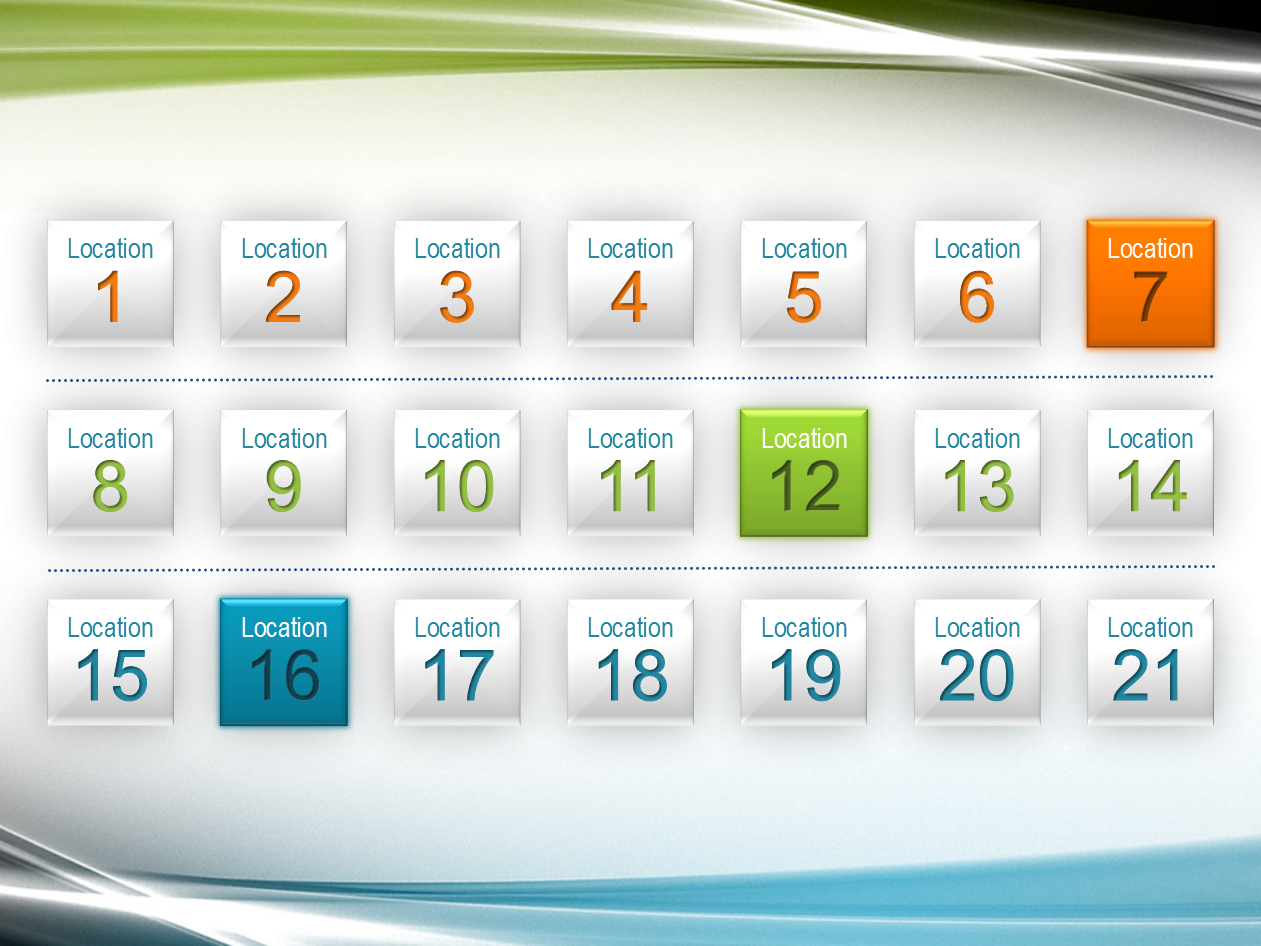
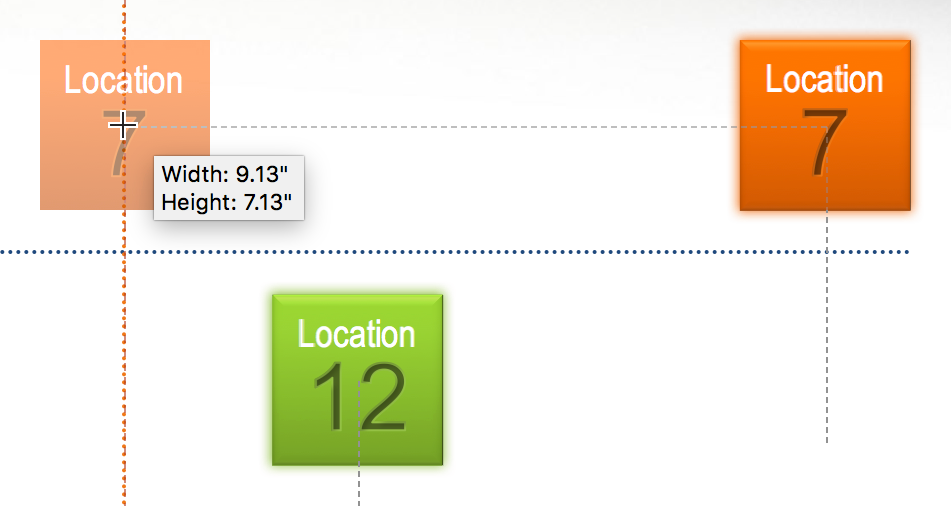
The orange, lime green, and turquoise groups each have a "winner" from their color category. Let's reveal the winner with formatting and animation techniques. We are going to create another shape on top of these that will fade in after an On Click cue. The winning coworking locations are 7, 12, and 16.
1. On the slide, select the first winning location, the Location 7 square.
2. Press Cmd-D (Mac) or Ctrl-D (Windows) to duplicate it. (Like we did for the divider slide in a previous exercise, we'll place the duplicate on top and style it differently.)
3. Because the original shape had an animation, the copy received the same one! To get rid of it, click on the duplicate's numbered box (to ensure only the animation will get deleted) and press Delete/Backspace.
4. On the slide, reselect the duplicate Location 7 square.
5. In the Home tab, click the Quick Styles button and select Intense Effect - Orange, Accent 4 (the orange option in the bottom row).
6. Near the top of the Format Shape panel, click the Effects button.
7. Choose Shadow, then Presets. Under Outer, choose Offset Center and set:
- Transparency: 0%
- Color: Orange, Accent 4 (eighth theme color)
8. In the duplicate Location 7 shape, highlight the word Location.
9. In the Home tab, click the click the arrow part of the Font Color button and choose the first theme color, White, Background 1.
10. Highlight the number 7 so we can change its font color as well.
11. Click the arrow part of the Font Color button again and choose Orange, Accent 4, Darker 50% (bottommost swatch under the eighth theme color, Orange).
NOTE: We'll leave the text outline as bright orange instead of dark orange to keep the impressive-looking beveled effect, a design element that helps add to the winners' sense of achievement.
12. Since you're more than likely a pro, repeat the same procedure for the Location 12 square, choosing the following lime green options instead:
- Choose Quick Styles > Intense Effect - Lime, Accent 1.
- For the shape shadow, use Lime, Accent 1 (fifth theme color).
- For the number 12, use Lime, Accent 1, 50% Darker (darkest lime green).
Don't forget to remove the animation, set the shadow's Transparency to 0%, and make the word Location the first theme color, White, Background 1!
13. Duplicate the Location 16 square and style it with these turquoise options (remove the animation and style Location with the first theme color, White, Background 1):
- Quick Style: Intense Effect - Turquoise, Accent 2
- Shape Shadow: Turquoise, Accent 2 (sixth theme color), with no Transparency
- Number 16 Color: Turquoise, Accent 2, 50% Darker (darkest turquoise)
14. Drag the new duplicates on top of their respective original shapes (drag the orange Location 7 square exactly on top of the white Location 7 square, etc.).
Using Transitions to Create a 2-Slide Motion Sequence
1. Click on a blank area of the slide to deselect all.
2. Build a selection of the new Location 7, Location 12, and Location 16 shapes with colored backgrounds (make sure you select them in this exact order).
3. From the Animations tab's green Entrance Effects, click the Shape effect.
4. Click the Effect Options button and under Direction, choose Out.
5. In the Animations tab, in the Timing section, set Start to On Click.
6. Press Cmd-Return (Mac) or Shift-F5 (Windows) to preview the animation sequence in fullscreen mode. Click through the slide to test out your work so far.
7. Press Esc to exit Slide Show View and return to Normal View.
8. After the big reveal, we want to make all of the non-winning squares disappear. Let's create another slide and add in a transition to create a seamless sequence. In the Slides list, Right-click on the current slide and choose Duplicate Slide.
9. Drag a selection box around all of the objects on the duplicate slide.
10. Shift-click on the three colored squares and the two lines to deselect them so they won't get deleted (the underlying gradient squares are still selected).
11. Press Delete/Backspace to delete all of the non-winning locations.
12. In the Animation Pane, click on the first animation and select all using Cmd-A (Mac) or Ctrl-A (Windows) if all of the animation effects aren't already selected.
13. Press the Delete key (not Backspace!) to remove the effects.
14. In the Transitions tab, select the Shape effect.
15. Set the Duration of the transition to 03.00.
16. In the Slides list, click on the previous slide to go back to it.
17. Press Cmd-Return (Mac) or Shift-F5 (Windows) to preview the transition sequence in fullscreen mode. Click through until the turquoise Location 16 square animates in.
18. Use the Arrow keys to preview the transition forward and backward. To a casual observer, it appears as though all the motion takes place on the same slide!
19. Make sure you're on the second slide in the sequence before pressing Esc.
Working with Motion Paths
We want to move the three winners into the center of the slide to further highlight their achievement. Let's add some motion paths, animations that move an object in a line (or along another shape). First, we need a "guide" in the center so that we can end all of our motion paths there. Let's use a temporary line for this purpose.
1. In the Insert tab, click the Shapes button, then click the Line shape.
2. Hold Shift and drag out a straight vertical line that's almost as tall as the slide.
3. In the (Shape) Format tab, click the Align button and choose Align Center.
4. In the following order, select the Location 7, Location 12, and Location 16 shapes.
5. To animate them along a linear motion path, follow the instruction for your platform:
- Mac: In the Animations tab, click the Path Animation button. In the menu, under Basic, choose Line.
- Windows: In the Animations tab, click the Add Animation button. In the menu, scroll to the bottom and under Motion Paths, choose Lines.
6. Notice that motion paths from top to bottom animate and appear for all three shapes. This is the default direction for a linear motion path.
7. Drag the red circle end of Location 7's motion path to the left, so that a straight horizontal line forms between the shape and the line, as seen below:
8. One at a time drag Location 12 and 16's red circles to the "guide" in the center of the slide so that a straight horizontal line forms between the shape and the line.
9. In the Animation Pane, select all of the animations if they aren't already.
10. In the Animations tab, in the Timing section, set Start to With Previous.
11. Set Duration to 01.50 to make it faster.
12. Click on the first item in the Animation Pane, then click the Play From button to preview the sequence.
13. We don't need the "guide" anymore, so select it and press Delete/Backspace.
14. Next, we'll add an animation where the divider lines go away. First, make sure that nothing is selected on the slide.
15. First click on the top divider line, then Shift-click the bottom divider line.
16. From the Animations tab's red Exit Effects that make objects disappear (not the similar green Entrance Effects that animate objects in!), click the Split effect.
17. In the Animations tab, in the Timing section, set the following:
- Start: With Previous
- Duration: 01.00
- Delay: 02.00 (Mac users will need to use the Animation Pane's Timing settings)
18. Click on the first item in the Animation Pane, then click the Play From button to preview the sequence again. Nice!
Custom Tabs: Adding Hidden Tools to the Ribbon
1. We want to put a rounded rectangular frame around the winners to further emphasize the achievement. In the Insert tab, click the Shapes button and under Basic Shapes, click the Frame shape.
2. Click on the slide to create a gray/white gradient frame. Notice that it isn't rounded (the yellow handle adjusts the width of the opening, not the roundedness of the corners). Oh no, it looks like we're out of luck on this one...
3. Take another look at the frame shape, and notice that it looks like two shapes were melded into one. There is a way to combine shapes, but the button is hidden and we'll have to create a custom tab to see it. It's possible to add any of the wide variety of hidden tools to a custom tab!
4. Press Cmd-Z (Mac) or Ctrl-Z (Windows) to undo the last action, deleting the frame.
5. Let's make the first of the shapes we'll combine later. In the Insert tab, click the Shapes button and select the sixth shape, Rounded Rectangle.
6. On the slide, create the outside of the "frame" by dragging out a rectangle that's tall/wide enough that all of the shapes will fit inside of it with some extra room:
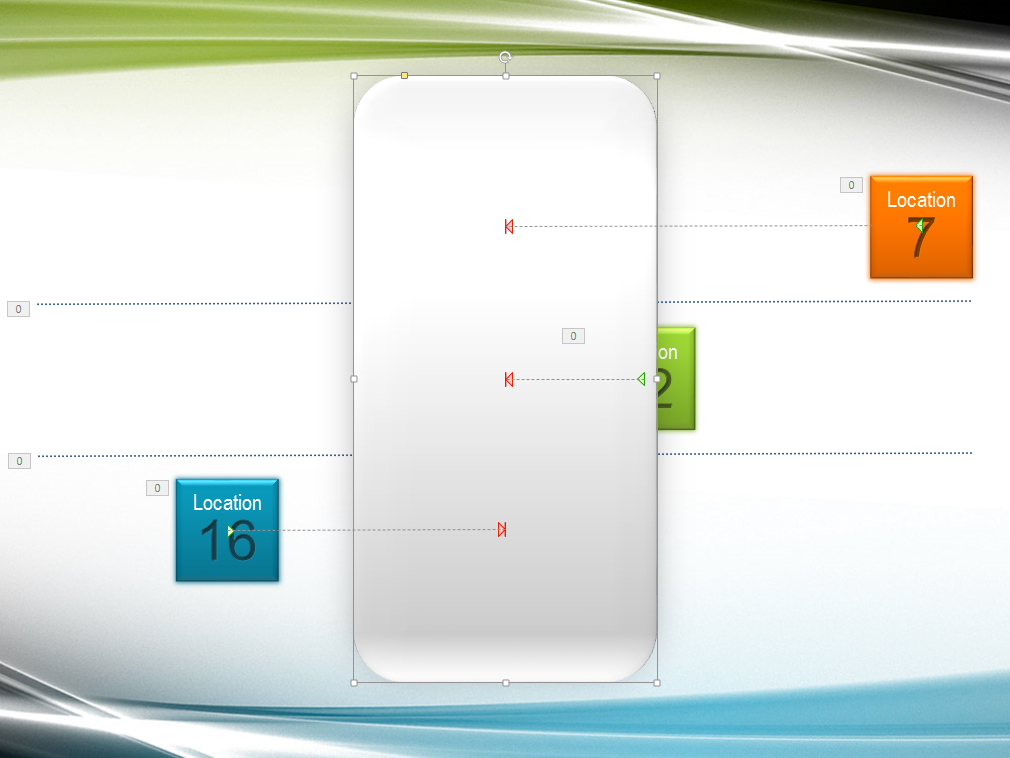
7. In the Home tab, click the Arrange button and choose Align > Align Center.
8. Click the Arrange button again and choose Align > Align Middle.
9. Click the Arrange button one more time and choose Send to Back so that the squares won't be underneath the rounded rectangle.
10. In the Animation Pane, click Play All to preview the sequence.
11. In the orange area at the top left above the tabs, click the Customize Quick Access Toolbar button (the rightmost icon) and select More Commands.
12. Go into the options for Ribbon customization using the instruction for your platform:
- Mac: At the top, click the Ribbon button.
- Windows: On the left, click on Customize Ribbon.
13. Under the Customize the Ribbon section on the right, click the word Insert so the tab you're about to add will get added to the right of that tab.
14. To create a new tab, go near the bottom and do the instruction for your platform:
- Mac: Click the Plus (+) button and from the menu, select New tab.
- Windows: Click the New Tab button.
15. Notice that a new item called New Tab (Custom) appears on the list. Select it.
16. To rename the tab, follow the instruction for your platform:
- Mac: Click the gear icon and from the menu, select Rename.
- Windows: Click the Rename button.
17. Set the Display name to Tools and click Save (Mac) or OK (Windows).
18. Select New Group (Custom). It represents a section of the new tab.
NOTE: The tabs on the Ribbon also have groups. For example, the Home tab has a Drawing section and the Animations tab has a Timing section.
19. Rename it to Shape Tools using the instructions in a previous step. Windows users will have the opportunity to give it an icon, but there's no need to select one.
20. On the left, near the top, set Choose commands from to All Commands.
21. In the list below it, scroll down until you find Combine. Select it.
22. On the right of this list, click the right-pointing arrow (>) (Mac) or the Add >> button (Windows).
23. At the very bottom, click Save (Mac) or OK (Windows). Mac users will then need to close the Preferences.
24. You now have a Tools tab (to the right of Insert). Yay! Save the file.
Combining Shapes to Create a Rounded Frame
1. On the slide, select the rounded rectangle and press Cmd-D (Mac) or Ctrl-D (Windows) to create the shape that will become the inner portion of our frame.
2. Drag the duplicate exactly on top of its original.
3. Hold Option (Mac) or Ctrl (Windows) and drag either the left or right edge to make the width around 0.4`"` smaller on both sides.
4. Hold Option (Mac) or Ctrl (Windows) and drag either the top or bottom edge to make the height around 0.4`"` smaller on both sides.
5. Drag the yellow handle of the inner rectangle towards the top-left corner to make its corners sharper.
6. Click on a blank area of the slide to deselect all.
7. Select both of the rounded rectangles so we can combine them.
8. In the Tools tab, click the Combine button.
Notice that the top shape was subtracted from the bottom shape. Very few PowerPoint users know about this nifty trick because the Combine option isn't visible by default. Neat!
9. In the Animation Pane, click Play All to preview the sequence.
10. Select the newly created rounded rectangle "frame" so we can animate it.
11. From the Animations tab's green Entrance Effects, click the Wheel effect. This effect animates in an element in a circular fashion (clockwise). By default, it animates in a single segment (called a spoke), but it can have up to eight segments. Cool!
12. Click the Effect Options button and choose 2 Spokes.
13. In the Animations tab, in the Timing section, set the following:
- Start: With Previous
- Duration: 01.50
- Delay: 01.80 (Mac users will need to use the Animation Pane's Timing settings)
14. In the Animation Pane, click on a blank area to deselect any animation and press Play All to preview the sequence.
The results are quite good, huh?
15. Let's create another rectangle that will serve as the area underneath the "frame." In the Insert tab, click the Shapes button, and select Rounded Rectangle .
16. On the slide, drag out a rectangle so that it's within the larger rectangle, but bigger than the "hole."
17. In the Home tab, click the Arrange button and choose Send to Back.
18. Click the Quick Styles button and choose Intense Effect - Blue-Gray, Dark 1 (the blue-gray option in the bottom row).
19. From the Animations tab's green Entrance Effects, click Shape.
20. Click the Effect Options button and under Direction, choose Out.
21. In the Animations tab, in the Timing section, set the following:
- Start: With Previous
- Duration: 01.00
- Delay: 00.00 (Mac users will need to use the Animation Pane's Timing settings)
22. Click on the first item in the Animation Pane, then click the Play From button. Wow, that really came together! But let's suppose the client doesn't want the animations to all occur at once. What could you do then?
23. Select the blue-gray rounded rectangle's numbered box, then set Start to After Previous.
24. Set Duration to 00.50.
25. Check out your hard work! In the Slides list, click on the previous slide.
26. Press Cmd-Return (Mac) or Shift-F5 (Windows) to preview. Click through the slide to see the entire 2-slide motion graphics sequence. Very nice!
27. Press Esc to exit Slide Show View.
28. Great job, and good luck in your future PowerPoint endeavors! Save the file.
Master Microsoft Office
Office is the industry standard for desktop publishing. It offers a full suite of productivity tools and is always adding new features.
We offer the best Microsoft Office training in NYC. Keep up to date and learn how to create engaging presentations, generate reports on the fly, automate tasks, and more! Our expert instructors guide students of all levels through step-by-step projects with real-world applications. Sign up individually, or contact us about corporate training today: