
Using Master Slides enables you to easily establish a consistent, coordinated look throughout a presentation, and it saves you time and energy! In this exercise, you'll lay out the Slide Master, which serves as a template for all content slides. Why are we creating the master first? Because it's the most important page in any PowerPoint presentation!
Downloading & Installing Class Files
These instructions tell you how to install the class files you'll need to go through the exercises in this workbook.
- Navigate to the Desktop.
- Create a new folder called Class Files (this is where you'll put the files after they have been downloaded).
- Go to nobledesktop.com/download
- Enter the code ppt16-1708-01
- If you haven't already, click Start Download.
- After the .zip file has finished downloading, be sure to unzip the file if it hasn't been done for you. You should end up with a PowerPoint 2016 Class folder.
- If you still have the downloaded .zip file, you can delete that. That's it! Enjoy.
Adding Background Images
1. Launch PowerPoint.
2. If you're on a Mac:
- Go into PowerPoint > Preferences and click on View.
- Under Ribbon, check on Show group titles. You can uncheck it when you get familiar with the interface.
- Close the Preferences window.
3. If a blank presentation isn't already open, double–click Blank Presentation. If you don't see anything, go into File > New from Template, then double–click Blank Presentation.
4. At the top, click on the Design tab.
5. In the Design tab, click the Slide Size button and choose Standard (4:3).
6. Click on the View tab at the top.
7. In the View tab, in the Ribbon (the area with buttons underneath the tab name), click the Slide Master button.
8. In the Slides list (the left sidebar that appeared), hover over the topmost slide (you may have to scroll up to see it).
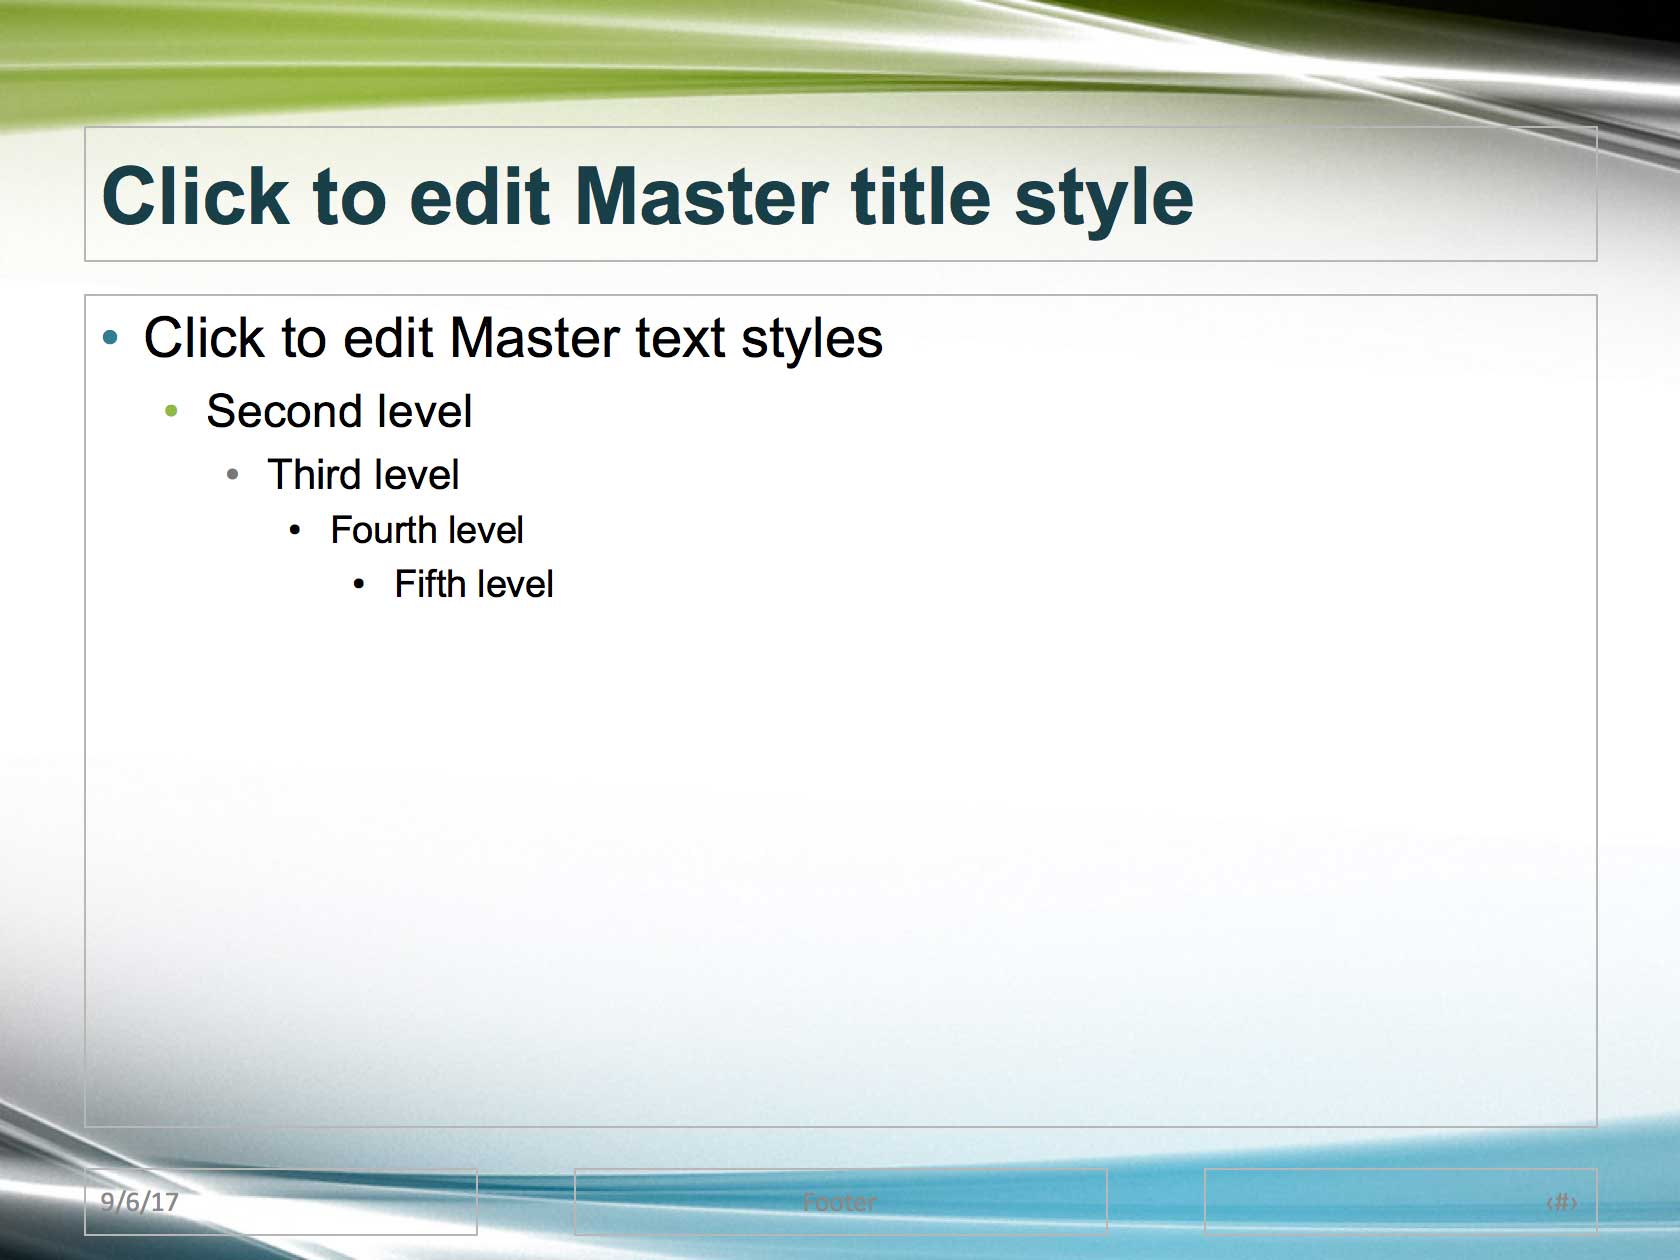
9. Notice that a label pops up that says Office Theme Slide Master: used by slide(s) 1. This is the Slide Master. It will hold top-level, general styling for your presentation.
10. Hover over the slide located second from the top. It should say Title Slide Layout: used by slide(s) 1. This is the Title Slide, one of the many layouts associated with the Slide Master.
11. For your convenience, the slides we'll use from the Slides list are labeled below. Keep them in mind as you work:
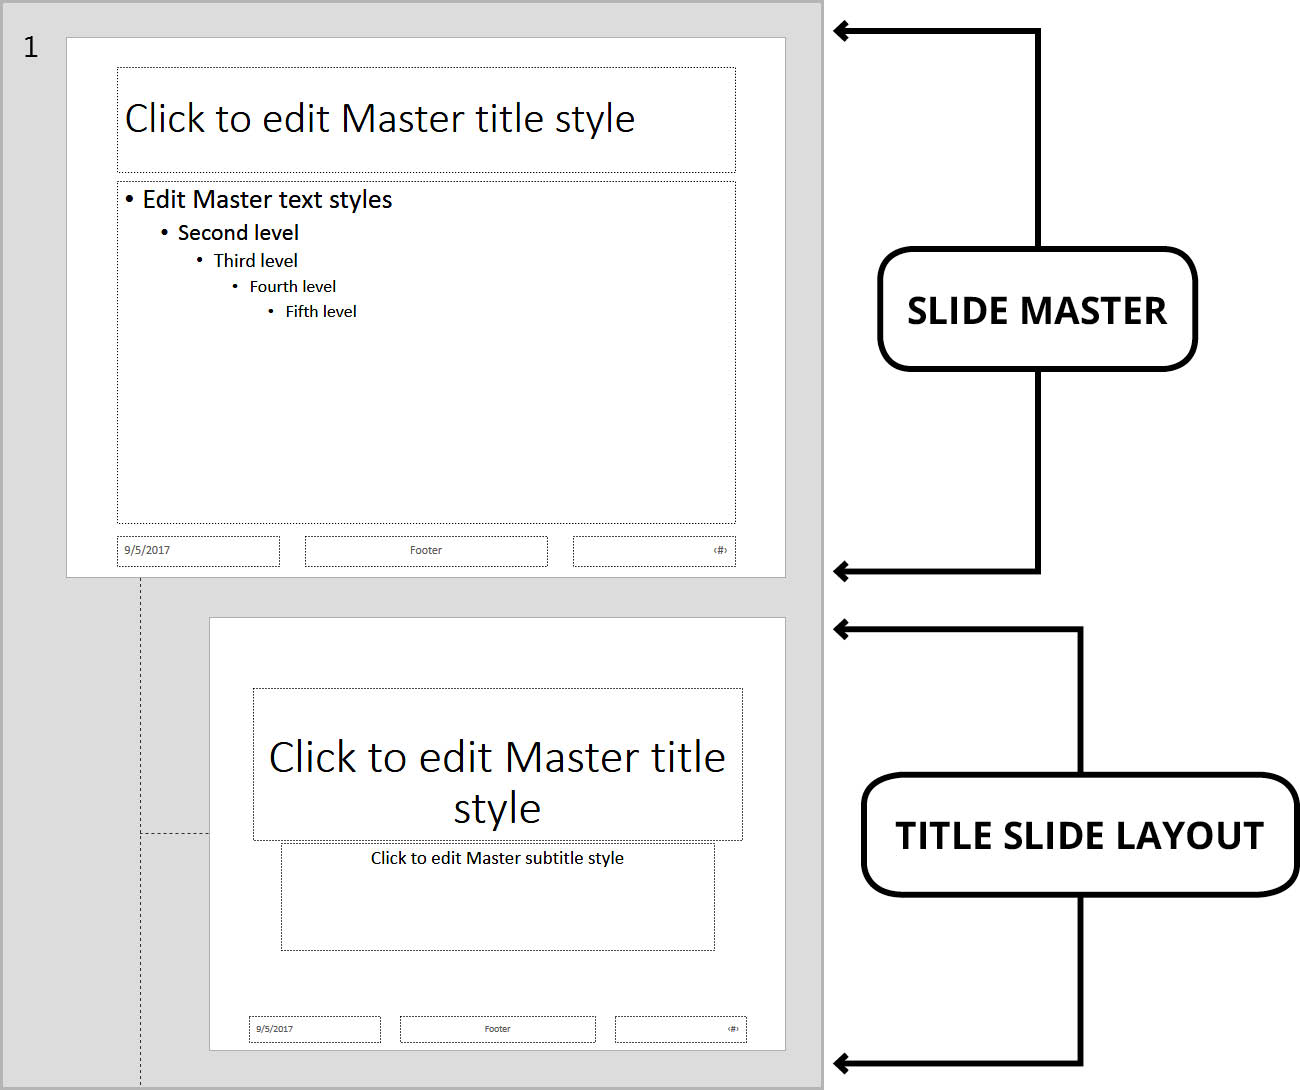
The Title Slide Layout controls the layout of all the title slides in a presentation (usually only the first slide in a presentation). It is indented, which means it inherits some attributes from the Slide Master.
12. In the Slides list, click on the Slide Master to select it.
13. In the Slide Master tab at the top, click the Background Styles button and choose Format Background. The Format Background panel will appear on the right.
14. Under Fill, select Picture or texture fill.
15. Below Insert picture from, click the File button.
16. Navigate to the Desktop. Then go into Class Files > yourname-PowerPoint 2016 Class > Source > Backgrounds and double–click Inside.jpg (it may say Inside if file extensions are hidden on your system).
17. Notice that all of the slide backgrounds are now filled with the image Inside.jpg. It looks great for content slides, but it's not well-suited for the title slide.
18. In the Slides list on the left, click on the Title Slide Layout to select it.
19. In the Format Background panel on the right of the screen, Picture or texture fill should still be selected.
20. Below Insert picture from, click the File button.
21. From the same folder, double–click on Cover.jpg to insert it.
The background of only the Title Slide has changed, and we have the beginning of our layout for both the Slide Master and the Title Master. Sweet!
24. It's important to save often. Go to File > Save As (Mac) or click on File (Windows).
24. If it asks you to sign in so you can save to OneDrive, close that window.
25. Windows only: Click Save As to save the presentation. Then under Save As click the Browse button.
11. If you see options to save it to OneDrive or another cloud-based location, go to the left of the dialog and click On my Mac (Mac) or This PC (Windows).
26. Navigate to the Desktop > Class Files > yourname-PowerPoint 2016 Class folder.
27. Set the following:
- File Name: yourname-Presentation.pptx
- Save as type: PowerPoint Presentation (.pptx)
28. Click Save.
Editing Text
1. In the Slides list on the left, click on the Slide Master (top slide) to select it.
2. We want to edit the text style in the title placeholder. Click directly on the bounding box (the frame) of the Click to edit Master title style placeholder.
NOTE: Clicking on the bounding box (frame) is very different from clicking on the content. It's how you can make changes to the entire element, not just a part of it.
3. Notice that sizing handles have appeared at the corners and edges of the box to show that it is selected.
4. Click on the Home tab at the top to reveal some formatting options.
5. In the Home tab, as shown below, click the small arrow next to the current font name to reveal the Font menu.
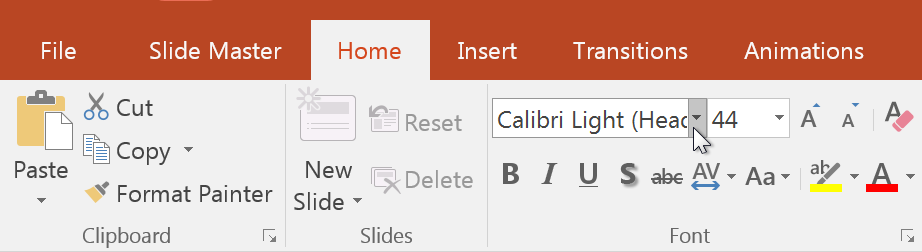
6. From the Font menu, choose Arial.
NOTE: When choosing fonts, it is a good rule of thumb to pick a system font so that the presentation will display properly on most computers. Arial fits the bill.
7. To the right of the font name in the Font Size text field, type 34 and press Return (Mac) or Enter (Windows).
8. Click the Bold button.
9. Let's style the body placeholder. Click on the bounding box of the body placeholder (the text box with the bulleted list).
10. In the Home tab, from the Font menu, choose Arial.
11. Click the Decrease Font Size button twice to reduce the font size. (Using this tool scales the fonts relative to the size they are in the bulleted list.)
12. That's a little too small. Click the Increase Font Size button once to make the text bigger.
13. In the Slides list on the left, click on the Title Slide Layout (second slide from the top).
While the title is much larger than the Slide Master, some of its formatting changes (such as the font) has also been applied here. The Title Slide Layout and the other indented layout slides automatically inherit some of the changes you make to the Slide Master. This nifty feature saves a lot of time!
14. The title font is too large, so let's tone it down. Click on the bounding box of the title placeholder text.
15. In the Home tab, in the Font Size text field, type 44 and press Return/Enter.
16. Click the Align Left button.
17. Click on the subtitle placeholder's bounding box.
18. In the Home tab, click the Align Left button.
19. In the Slides list on the left, click back on the Slide Master.
Notice that changes to the Layout Slides do not affect the Slide Master.
20. At the top left, above all the tabs, click the Save button to save the presentation.
Adjusting Bullets & Indents
We think that the bullets after the first line are too far indented. Let's adjust them, and while we're at it, learn how to adjust the space between the bullet and the text.
1. Click anywhere in the second line of the bulleted list to place the cursor there.
2. To adjust the bullets, we'll need to use the rulers. Let's make sure the rulers are showing. Click on the View tab at the top.
3. In the Show options, check on Ruler if it isn't already checked.
4. As shown below, there should be a ruler above the slide with two markers on it:
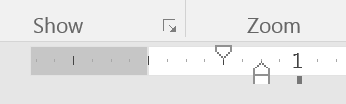
These two markers control the positioning of the bullet. The top marker is called the First-line indent marker and shows the indent position of the bullet. The bottom marker is called the Left indent marker and shows the indent position of the text.
5. Drag the First-line indent marker to the right by one notch.
6. Notice that the position of our bullet has changed. (You'll only see the bullet position change when you release the mouse.)
7. To adjust the distance of the text from the bullet, we must move the Left indent marker. However, it matters which part of the marker you drag from:
- Drag the square bottom of the Left indent marker to the right a few notches.
- Notice that this moves both our First-line indent marker and the Left indent marker, keeping the space between the bullet and text, moving the whole thing over.
- Drag the triangular top of the Left indent marker to the right a few notches.
- Notice now that only the Left indent marker moves to the right, altering the space between the bullet and the text.
Now that we know how the markers adjust the position of the bullets, let's set the layout we want. The next several steps will give you some specific placements to achieve this design.
NOTE: The final bullet layout we want is shown in the exercise preview at the beginning of the exercise.
8. Make sure the markers for the first line of text in the list are set as shown below (we like this default as it is):

9. Place the cursor in the second line of text in the list and set the markers as shown:

10. Place the cursor in the third line of text in the list and set the markers as shown:

11. To relieve yourself of this tedium, click in the fourth line of text. Right-click and choose Paragraph. Right-click is your friend.
TIP for Mac users: If you have a single-button mouse, Right-click may not work. If you can't configure your mouse to work like a mouse with multiple buttons, you will need to Ctrl-click whenever we tell you to Right-click. We won't remind you again.
12. Under Indentation, next to Before text, type 1.38" (You may need to type the quote mark!)
13. Make the By amount 0.25" if it is not already, then click OK.
14. Right-click in the fifth line of text and choose Paragraph.
15. Next to Before text, type 1.75"
16. Make the By amount 0.25" if it is not already, then click OK.
Creating Effective Color Themes
1. Click on the Slide Master tab at the top.
2. In the Background section, click the Colors button to bring up the Theme Colors menu.
3. Notice that we have a list of preset theme colors we can choose from. We can also create our own to accurately match the background images. At the bottom of the menu, click Customize Colors.
4. On the left side of the dialog, notice all the areas you can apply theme colors to. We will leave the top four (Text/Background) options alone for now.
5. Let's edit the accent colors to match the background image. Next to Accent 1, click on the Color swatch.
6. Windows only: From the menu, choose More Colors.
7. Do the instruction for your platform to see how the color changes:
- Mac: In the Colors panel, make sure you're in the Color Wheel tab (the first one). Then click and drag inside the color wheel.
- Windows: In the Colors dialog, click on the Custom tab. Then drag the cursor inside the color spectrum box.
8. On the bottom of the color wheel (Mac) or the right of the color spectrum box (Windows), use the slider to lighten or darken the color.
9. Do the instruction for your platform to make sure we're choosing RGB colors:
- Mac: | In the Colors panel, click on the Color Sliders tab (second from the left). If the menu says Grayscale Slider, click it and choose RGB Sliders.
- Windows: | From the Color model menu, make sure RGB is selected.
10. Set the following options:
- Red: 142
- Green: 185
- Blue: 71
Press Tab to apply the colors fully.
11. We want to assign a second accent color. Do the instruction for your platform:
- Mac: Leave the Colors panel open, but move it so you can see the Create Theme Colors dialog.
- Windows: Click OK to close the Colors dialog, but leave the Create Theme Colors dialog open.
12. Next to Accent 2, click on the color swatch. Windows users will also need to choose More Colors.
13. Set the following options:
- Red: 48
- Green: 126
- Blue: 144
Press Tab to apply the colors fully.
14. Leave the Color panel open (Mac) or click OK (Windows).
15. Let's create a third accent. Next to Accent 3, click on the swatch. Windows users will also need to choose More Colors.
16. Set the following options:
- Red: 119
- Green: 119
- Blue: 119
Press Tab to apply the colors fully.
17. Close the Color panel (Mac) or click OK (Windows).
18. Under Name type Leaf Works.
19. Click Save to save the color theme for the presentation.
Applying Theme Colors to Bullets
1. Let's apply the theme colors we just saved to our bulleted list! Click anywhere in the first line of the list.
2. Click on the Home tab at the top.
3. In the Paragraph section (near the middle), click the arrow part of the Bullets button to bring up the menu. From the menu, choose Bullets and Numbering.
NOTE: Some buttons have arrows to their right. In general, clicking the arrow part brings up more options, and clicking on the picture applies either a default look or applies the formatting you last applied when you clicked the button. (These buttons are segmented into two parts, and only one of those parts will be highlighted when you hover over them.)
4. Under Color, click the Color menu.
5. A menu will appear containing lighter and darker variations of all the theme colors.
6. In the top row, select the sixth theme color.
7. Click OK. The first bullet point is now Dark Teal.
8. Let's change the color of the second level of the bulleted list. Place the cursor in the second line of the bulleted list.
9. In the Home tab, click the arrow part of the Bullets button and choose Bullets and Numbering.
10. Under Color, click the Color menu.
11. In the top row, select the fifth theme color (Olive Green).
12. Click OK.
13. Let's change the color of the third level of the bulleted list. Place the cursor in the third line of the bulleted list.
14. In the Home tab, click the arrow part of the Bullets button and choose Bullets and Numbering.
15. Next to Color, click the Color menu.
16. In the top row, select the seventh theme color.
17. Click OK. The fourth and fifth level bullets can remain black.
18. We also want to change the color of the title. Click on the bounding box of the Click to edit Master title style text.
19. In the Home tab, click the arrow part of the Font Color button.
20. You can hover over a color to see its name and assignment. In the bottom row, select the darkest version of the sixth theme color, Dark Teal, Accent 2, Darker 50% (6th row, 6th swatch from the left).
Positioning Placeholders
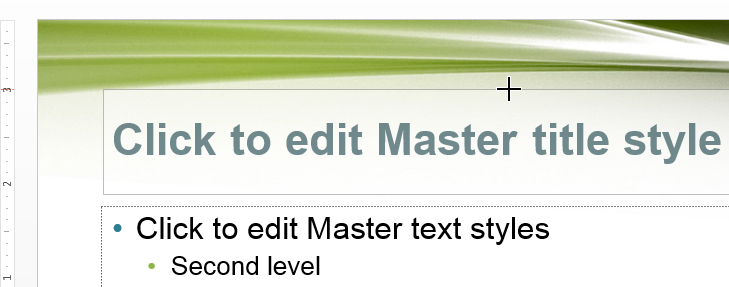
1. Let's reduce the size of the title placeholder. You should still have the title placeholder text selected. If not, click on the Click to edit Master title style text's bounding box.
NOTE: On the rulers there are markers, which run from zero in the middle to larger numbers at the edges. This shows the edge's coordinates in inches.
2. Drag the topmost middle handle downward, so that the top border of the bounding box aligns with the 3 towards the top of the left-hand ruler:
3. Save the presentation by pressing Cmd–S (Mac) or Ctrl–S (Windows).
Awesome! Your Slide Master looks pretty nice. In the next exercise, we'll finish setting up the Title Slide Layout and get rid of the placeholders we don't need.
Master Microsoft Office
Office helps users create professional reports, presentations, records, data sets, and more. PowerPoint, along with other apps such as Excel, is an essential tool for anyone working in a business setting.
We offer the best Microsoft Office training in NYC. Our expert instructors guide students of all levels through step-by-step projects with real-world applications. Sign up individually, or contact us about corporate training today: