
In this exercise, you will arrange the presentation's content in sections according to the presenter's agenda, as shown on the divider slide you made in a previous exercise. Accordingly, you'll also create a divider slide for each section, serving organizational purposes for both the presenter and the audience.

Getting Started
1. If you have any presentations open, in PowerPoint, go to File > Close to close them. You may have to close more than one.
2. Still in PowerPoint, go to File > Open to open the next project.
3. Under Open, click on On my Mac or This PC.
4. Navigate to the Desktop > Class Files > yourname-PowerPoint 2016 Class folder.
5. Double-click Sections.pptx to open it.
Adding & Renaming Sections in Slide Sorter View
1. In the Slides list, click on the divider slide (Slide 2).
2. Look at the slide, and notice we need to divide the presentation into four sections: Coworking, Stats, Leaf Works, and Conclusion.
3. At the bottom of the window, click the Slide Sorter View button to see thumbnails of your slides. It's best to section off a presentation in this view mode because the thumbnails take up all of the available screen space.
Also at the bottom of the window, feel free to zoom in or out as needed.
4. Right-click on the divider slide and choose Add Section.
5. A Rename Section pop-up will appear. Do not close it yet. First notice that the divider slide and all the slides following it are moved to a new section. (Depending on the size of your screen and your level of zoom, it may look slightly different from the screenshot below.)
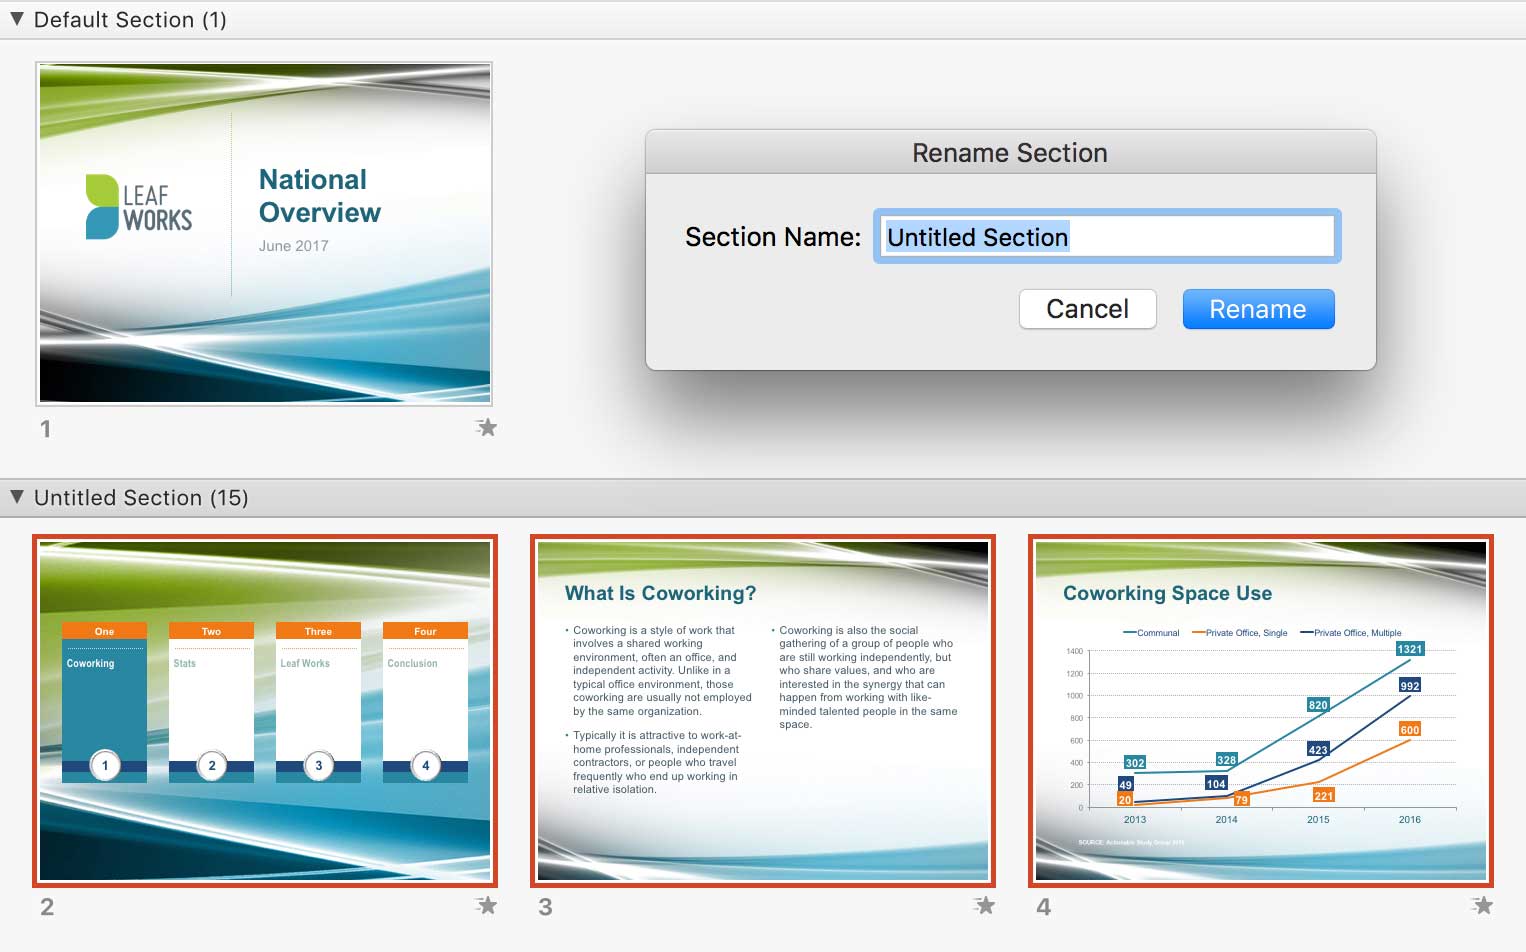
6. In the Rename Section pop-up, rename the new section by typing Coworking into the field.
7. Click Rename or press Return/Enter to apply the change.
8. Above the title slide, Right-click on the horizontal Default Section bar and choose Rename Section.
9. In the field, type: Intro and press Return/Enter to rename it.
10. In the Coworking section, drag these slides so they are in the following order (don't worry about the rest—they'll be in a different section):
- Divider
- What Is Coworking?
- Quotation
- Benefits of Collaboration
Arranging Slides: The Stats Section
1. Right-click on the white space following the Benefits of Collaboration slide and choose Add Section.
2. In the Rename Section field, type: Stats and press Return/Enter to rename it.
3. If these slides in the Stats section aren't in the following order, drag them:
- Coworking Space Use
- Coworking Demographics
- Sales Among Age Groups
Arranging Slides: The Leaf Works Section
1. Right-click in the white space after the Sales Among Age Groups slide and choose Add Section.
2. In the Rename Section field, type: Leaf Works and press Return/Enter to rename it.
3. Drag the following slides in the correct order for the Leaf Works section:
- Who Is Leaf Works?
- Leaf Works Office Income (2016)
- Leaf Works Locations (1-picture layout)
- Leaf Works Locations (2-picture layout)
- Leaf Works Locations (map)
- Leaf Works Model
Arranging Slides: The Conclusion & Appendix Sections
1. After the Leaf Works Model slide, add a Conclusion section as follows:
- Right-click in the space after the Leaf Works Model slide and choose Add Section.
- In the Rename Section field, type: Conclusion and press Return/Enter.
2. Make sure the Conclusion section contains the Partners (logo) slide and the Peter Bowen (contact) slide, in that order.
3. At the end of the presentation, add an Appendix section by doing the following:
- Right-click in the space after all of the slides and choose Add Section.
- In the Rename Section field, type: Appendix and press Return/Enter.
Adding Divider Slides at the Start of Each Section
To place divider slides at the beginning of each section, let's copy and paste the divider slide we have, then make the needed modifications to each of the turquoise shapes that show which part of the presentation is coming up.
1. Still in Slide Sorter View, select the divider slide at the beginning of the Coworking section (Slide 2).
2. Press Cmd-D (Mac) or Ctrl–D (Windows) to duplicate the divider slide.
3. Drag the duplicate divider slide to the beginning of the Stats section.
4. Copy the duplicate slide.
5. In the Leaf Works section, click to the left of the first slide.
6. Paste the divider slide into the section.
7. In the Conclusion section, click to the left of the first slide and paste the slide.
8. Double-click on the divider slide at the start of the Stats section to go into Normal View.
9. Let's highlight the appropriate sections in the divider slides. Click on the turquoise Coworking object.
10. Drag the turquoise shape on top of the Stats group to the right, using the guides and the snapping function for alignment.
11. On the turquoise shape, replace the text with: Stats
12. In the circle, replace the number with: 2
13. Repeat this process for the divider slides at the beginning of the Leaf Works and Conclusion sections.
14. You've given the presentation a much more logical structure! Save the file.
Master Microsoft Office
Microsoft Office is a suite of productivity tools that benefit not only individual users, but whole teams. Learn how to harness the full power of Office for your business. We offer the best Microsoft Office courses in NYC. Our expert instructors help students create engaging presentations, generate reports on the fly, automate tasks, and more! Sign up individually, or contact us about corporate training today: