
In this exercise, you're going to create a variety of shapes and experiment with advanced formatting options to apply some special styling to them.
Getting Started
1. If you have any presentations open, in PowerPoint, go to File > Close to close them. You may have to close more than one.
2. Still in PowerPoint, go to File > Open to open the next project.
3. Under Open, click on On my Mac or This PC.
4. Navigate to the Desktop > Class Files > yourname-PowerPoint 2016 Class folder.
5. Double–click Shapes.pptx to open it.
Creating the Outer Shape
1. In the Slides list, select the slide that we completed in the previous exercise (the Partners logo slide).
2. In the Home tab, click the arrow part of the New Slide button and choose Title Only.
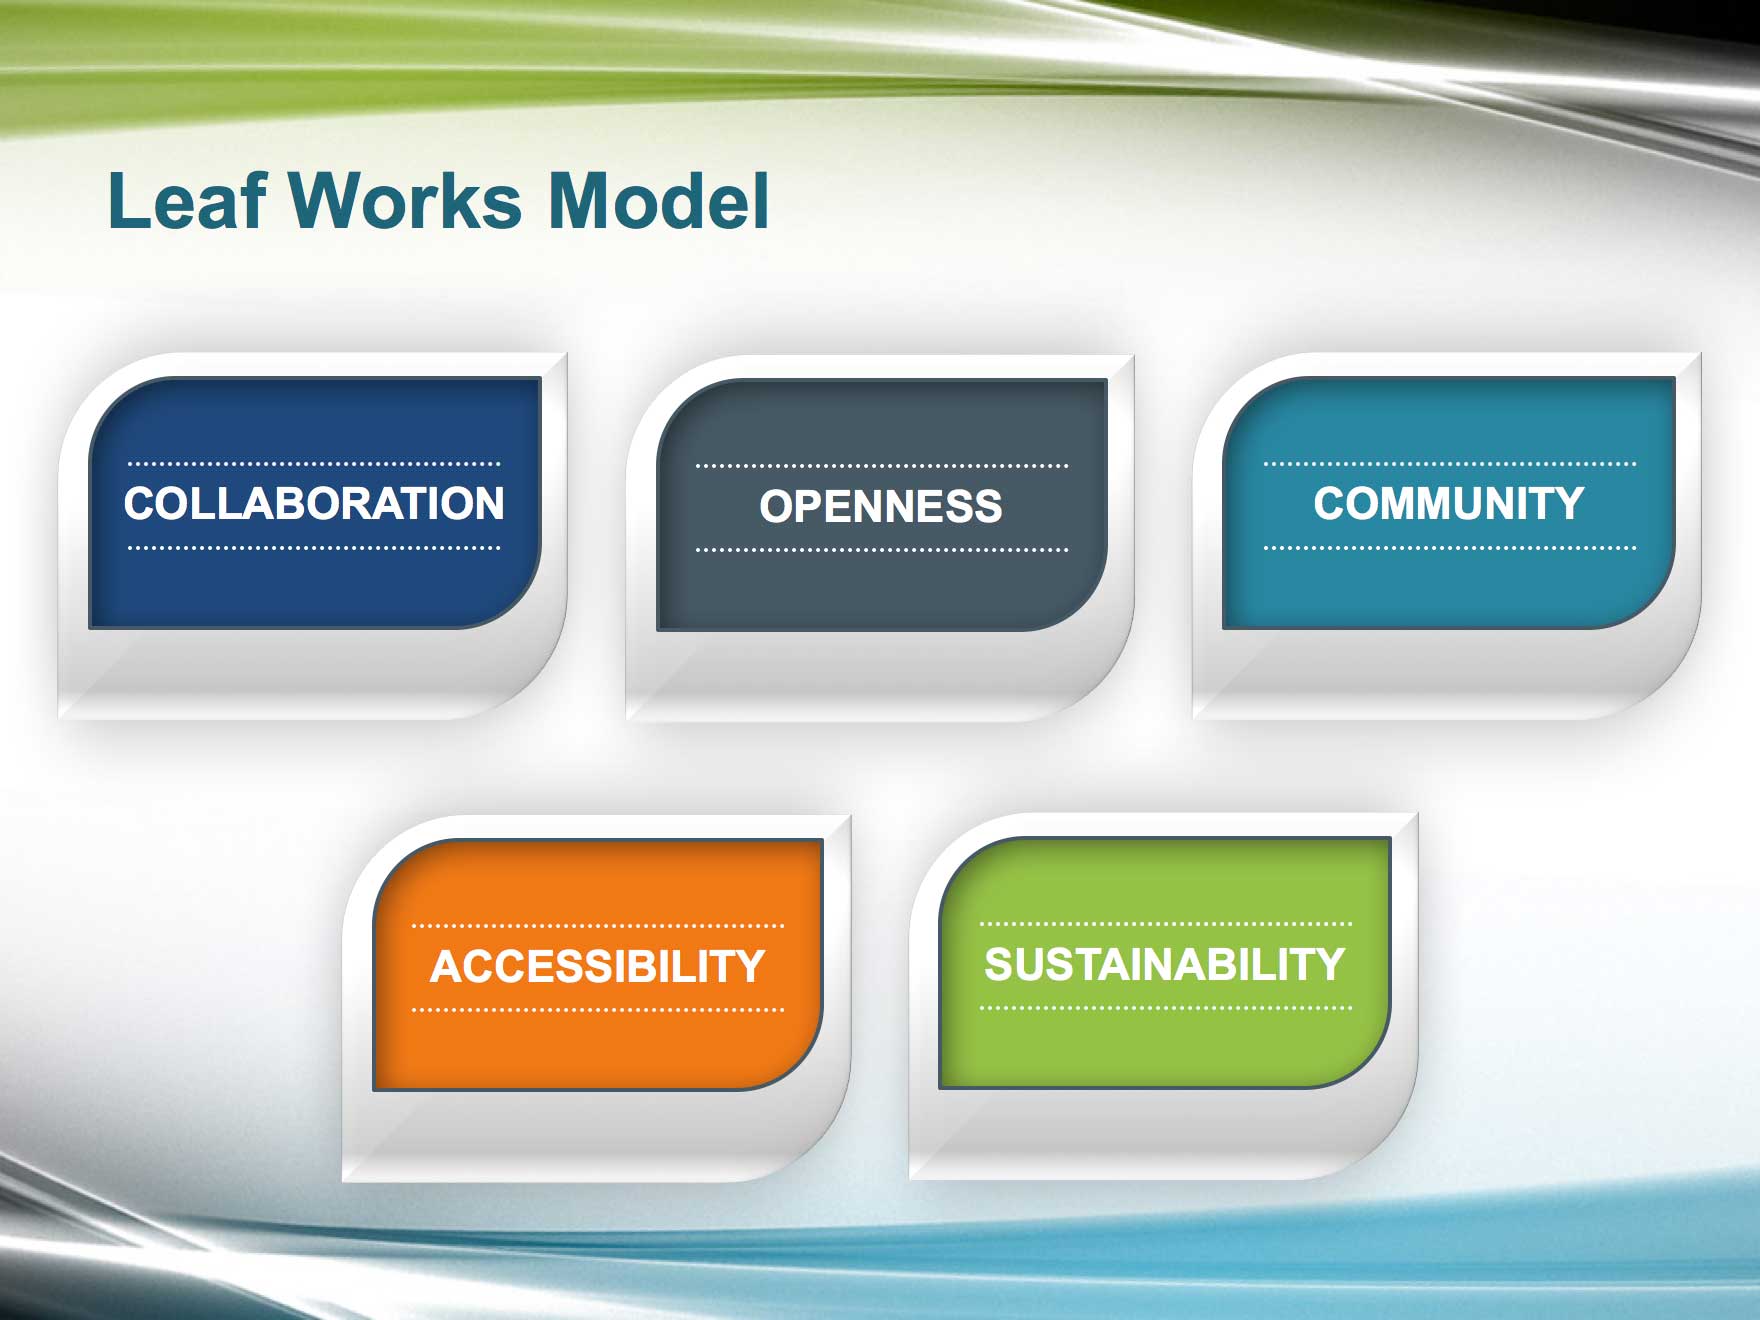
3. In the title placeholder, type: Leaf Works Model
This slide will highlight Leaf Works' five core values. To make them look interesting and consistent with the company branding, let's display them as shapes that are similar to the shapes in the Leaf Works logo.
4. Let's start off by making the background shape. In the Insert tab, click the Shapes button.
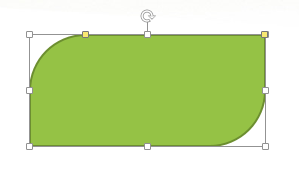
5. Under Rectangles, select Round Diagonal Corner Rectangle (it's the last rectangle listed).
6. Drag the cursor on a blank area on the slide to create a new rectangle. We'll set its size and position soon.
7. Notice that this shape has two yellow handles on its bounding box. These allow us to modify the curve of the rounded corners. Drag the leftmost yellow handle a little to the right.
Notice that the shape's top-left and bottom-right corners are more rounded.
8. In the (Shape) Format tab, set the Height to 2.09" and the Width to 2.89."
9. Right-click on the shape and choose Size and Position.
10. Expand the Position options and set Horizontal position to 0.53" and Vertical position to 2."
11. Near the top of the Format Shape panel, click the Fill & Line button to display formatting options for fills and lines.
12. Under Fill, choose Gradient fill.
13. Below Gradient fill, next to Angle, type: 270
14. If there are more than two gradient stops on the gradient bar, delete the inner stops by selecting them and clicking the Minus (–) button (Mac) or the Remove gradient stop button (Windows).
15. Drag the leftmost gradient stop all the way to the left, so its position is 0%.
16. Click the Color button and choose the first theme color, White, Background 1.
17. We want a more complex gradient this time, so let's add another stop. Click the Plus (+) button (Mac) or the Add gradient stop button (Windows).
18. Drag the new gradient stop so its position is 8% (you can also type it manually).
19. With the new gradient stop selected, click the Color button. Under the first theme color, in the third row, choose White, Background 1, Darker 25%.
20. Drag the rightmost gradient stop all the way to the right, to a position of 100%.
21. With the rightmost stop selected, click the Color button. Under the first theme color, in the second row, choose White, Background 1, Darker 15%.
22. Let's create one last gradient stop. Click the Plus (+) button (Mac) or the Add gradient stop button (Windows).
23. Drag the new gradient stop so that its position is 80%.
24. With the new gradient stop selected, click the Color button and choose the first theme color, White, Background 1.
25. In the Format Shape panel, expand the Line options and choose No line.
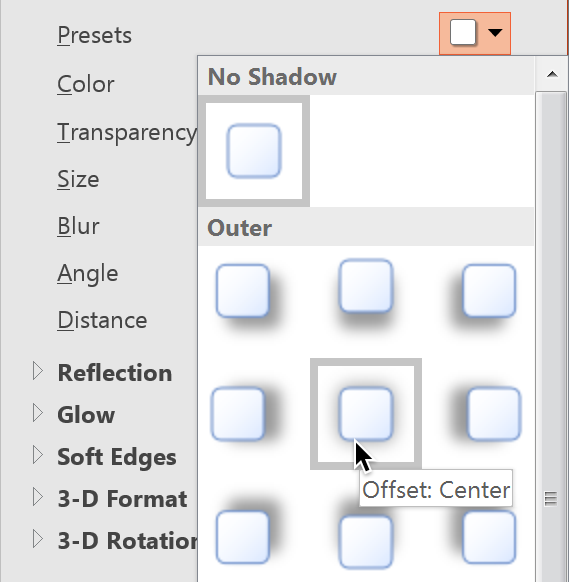
26. Let's add a shadow for pizazz. Near the top of the Format Shape panel, click the Effects button to display some nifty effects we can add to objects.
27. Expand the Shadow options.
28. From the Presets menu, under Outer, choose Offset Center:
29. Set the following values:
- Transparency: 65%
- Size: 96%
- Blur: 39 pt
- Angle: 0°
- Distance: 0 pt
30. Expand the 3-D Format options.
31. Click the Top bevel button and under Bevel choose the first option: Circle (Mac) or Round (Windows). (The name will show when you hover over it.)
32. To the right of the Bevel's Top option, set:
- Width: 52 pt
- Height: 2 pt
Creating the Inner Shape
Let's add a similar, smaller shape inside the background shape.
1. Hold Option (Mac) or Ctrl (Windows) and drag the shape to create a duplicate of it.
2. With the duplicate shape selected, in the (Shape) Format tab, set the Height to 1.42" and the Width to 2.55."
3. With the new shape selected, on the right side of the Home tab, click the Quick Styles button.
Using a Quick Style changes all the shape's formatting to the preset values shown in the thumbnail you click on. Each style is based on our theme colors.
4. Choose Colored Outline - Blue-Gray, Dark 1 (the first choice).
5. Right-click on the bounding box of the new shape and choose Format Shape.
6. Under the Fill options, choose Solid fill.
7. Click the Color menu and choose the fourth theme color, Dark Blue, Text 2.
8. Near the top of the panel, click the Effects button.
9. In the Shadow options, from the Presets menu, under Inner, select the top-left corner option: Inside Diagonal Top Left (Mac) or Inside: Top Left (Windows).
10. Set the following Shadow values:
- Transparency: 50%
- Blur: 16 pt
- Angle: 225°
- Distance: 4 pt
11. Let's change the position next. Near the top of the panel, click the Size & Properties button to display size, position, and text box formatting options.
12. Under Position, set Horizontal position to 0.71" and Vertical position to 2.15."
Formatting Text in Shapes & Fixing Text Overflow
Let's add text with one of the corporate values to our smaller rectangle, and then format that text so it looks good and fits well within the shape.
1. Click on the inner shape and type COLLABORATION in it. (Make sure to type it in all caps.)
2. Select the text by highlighting it or double-clicking on it.
3. In the Home tab, click the Bold button to make the text easier to read in the context of a presentation.
4. Still in the Home tab, set the rest of the formatting options:
- Font Color: White, Background 1 (first theme color)
- Font: Arial
- Font Size: 18 pt
5. The word may be split onto two lines, but don't worry—we can format the text box to fix the problem. Deselect the shape by clicking off of it.
6. Right-click on the shape and choose Format Shape.
7. In the Format Shape panel, click on Text Options.
8. Near the top of the panel, click the Textbox button.
9. Set both Left margin and Right margin to 0."
NOTE: If the word COLLABORATION is still split onto two lines, simply select the inner shape and drag the left yellow handle towards the left.
Nice! No one would guess that you made these graphics yourself in PowerPoint.
Adding Accent Lines
Let's add two dotted lines to fancy up the blue foreground shape.
1. In the Insert tab, click the Shapes button, and then under Lines, click the Line shape.
2. Hold Shift and drag the cursor to create a horizontal line above the text.
3. With the line selected, in the (Shape) Format tab, set Width to 2.13."
4. Right-click on the line and choose Format Shape.
5. Under Line, select Solid line.
6. From the Color menu, choose the first theme color, White, Background 1.
7. Set Width to 2 pt.
8. Near the top of the panel, click the Size & Properties button.
9. Under Position, set Horizontal position to 0.94" and Vertical position to 2.64."
10. The line should still be selected. Hold Option (Mac) or Ctrl (Windows) and drag out a duplicate of the line below the COLLABORATION text.
11. Right-click on the new line and choose Format Shape.
12. In the Format Shape panel, click the Size & Properties button.
13. Under Position, set Horizontal position to 0.94" and Vertical position to 3.11."
14. Make sure that the shapes you just created look like this:

Adding More Shape Groups
We're just about ready to add the rest of the four corporate values, but first, we need to group the shapes that we've already made.
1. Drag a selection box around the bottom shape, top shape, and the lines.
2. Right-click on any of these elements and go to Group > Group.
3. Let's make two copies of this group to comprise the top row. Hold Option–Shift (Mac) or Ctrl-Shift (Windows) and drag out a copy to the right. (Select Copy Here if you see a dialog.)
4. Deselect all by clicking somewhere off the shapes.
5. Click on the copy, hold Option (Mac) or Ctrl (Windows) and drag out a copy to the right. You should now have three shape groups.
6. Let's distribute them evenly across the slide. Drag a selection box around the three groups.
7. In the Home tab, click the Arrange button, then Align > Align to Slide.
8. Click the Arrange button again, then Align > Distribute Horizontally.
Now let's align them, so they are perfectly aligned in the same row.
9. Click the Arrange button, then Align > Align Selected Objects.
10. Click the Arrange button, again, then Align > Align Middle.
11. In the middle shape, replace the text with: OPENNESS
12. In the rightmost shape, replace the text with: COMMUNITY
13. Click on the OPENNESS group, then Shift-click the COMMUNITY group to select them both.
14. Hold Option (Mac) or Ctrl (Windows) and drag out duplicates to create a bottom row with two groups.
15. The OPENNESS and COMMUNITY groups in the bottom row should still be selected. To center them horizontally, we need to group them first. Right-click on either of them and go to Group > Group.
16. In the Home tab, click the Arrange button, then Align > Align Center.
17. With the OPENNESS and COMMUNITY groups in the bottom row still selected, Right-click on either group and choose Group > Ungroup.
18. In the left shape in the bottom row, replace the text with: ACCESSIBILITY
19. In the right shape in the bottom row, replace the text with: SUSTAINABILITY
Adding Some Color Variety
1. In the top row, click anywhere on the OPENNESS group.
2. Within the group, click on the blue area to select the top shape.
3. Right-click on the blue area and choose Format Shape.
4. Under Fill, select Solid fill.
5. From the Color menu, choose the second to last theme color, Blue-Gray, Accent 5.
6. Click anywhere on the COMMUNITY group, then click on its blue area.
7. In the Format Shape panel and under Fill, from the Color menu, choose the sixth theme color, Turquoise, Accent 2.
8. Follow the same process for the bottom row groups, choosing these colors:
- ACCESSIBILITY: Orange, Accent 4 (eighth theme color)
- SUSTAINABILITY: Lime, Accent 1 (fifth theme color)
9. Pretty sleek, huh? Save the file.
Master Microsoft Office
Microsoft Office is a suite of productivity tools that benefit not only individual users, but whole teams. Learn how to harness the full power of Office for your business. We offer the best Microsoft Office training in NYC. Our expert instructors offer years of industry experience and help students create engaging presentations, dynamic reports, and more. Sign up individually, or contact us about corporate training today: